YARN in Practice
更新时间:2021/04/28
参考资料:
前置内容:
1 Overview
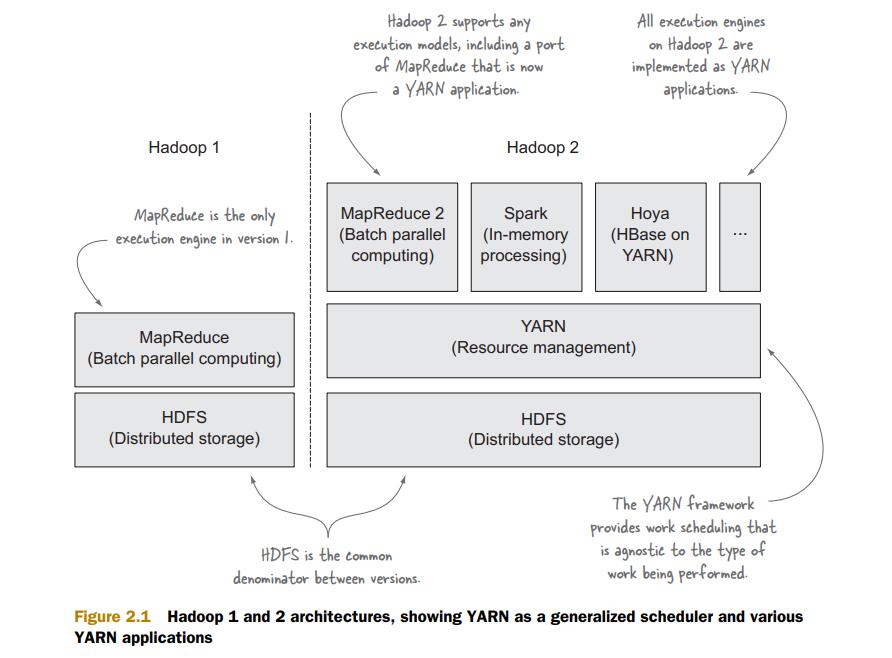
YARN与其他Hadoop组件的关系图,也为Hadoop 2结构框图:
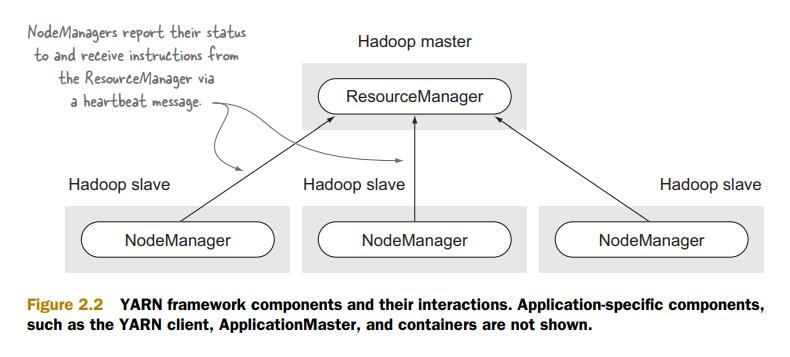
 YARN内部结构图:
 YARN application与YARN的关系:
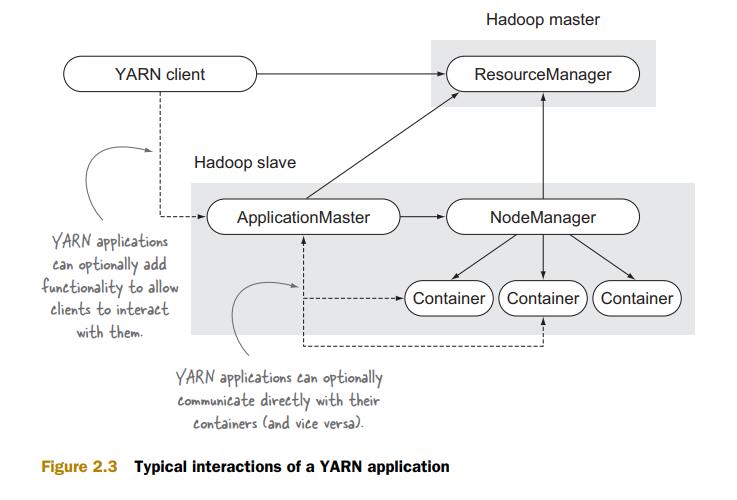 可以看到,YARN app需要三个组件,YARN client,ApplicationMaster,Container
YARN client:与RM交互,创建AM
AM:YARN app的master process,并且还需要管理运行app的containers,向RM请求containers,在NM上真正部署containers
可以看到,YARN app需要三个组件,YARN client,ApplicationMaster,Container
YARN client:与RM交互,创建AM
AM:YARN app的master process,并且还需要管理运行app的containers,向RM请求containers,在NM上真正部署containers
2 YARN Configuration
参考资料:https://hadoop.apache.org/docs/stable/hadoop-yarn/hadoop-yarn-common/yarn-default.xml
如何配置?
通过.xml文件配置YARN,编写property,具体参考官方文档
如何查看?
在Hadoop页面的Configuration中可以查看
 如果您不明白配置文件中的值,您可以:
- 测试yarn-site.xml中的property values,如果某个entry没有配置,则运行默认配置
- 在RM UI中的Configuration里观察正在运行的配置,对比官方文档的介绍来查明其意义
3 Distributed Shell
官方的YARN已经绑定了两个应用程序,分别是MapReduce 2和DistributedShell,现在我们尝试运行起DistributedShell。 在命令行中输入:
hadoop org.apache.hadoop.yarn.applications.distributedshell.Client \
-debug \
-shell_command find \
-shell_args '`pwd`' \
-jar ${HADOOP_HOME}/share/hadoop/yarn/*-distributedshell-*.jar \
-container_memory 350 \
-master_memory 350
如果在最后出现 INFO distributedshell.Client: Application completed successfully 代表运行成功。 这一串代码的意义是,使用DistributedShell运行一个find命令,但显然在输出中,我们并没有看到任何携带’Find’的语句。这是因为AM将find命令实际运行在分里的containers中,标准输出被重定向到container的log output目录下。所以如果想看到find命令的output,我们需要访问那个directory。
3.1 访问container logs
方法:使用CLI和UI访问
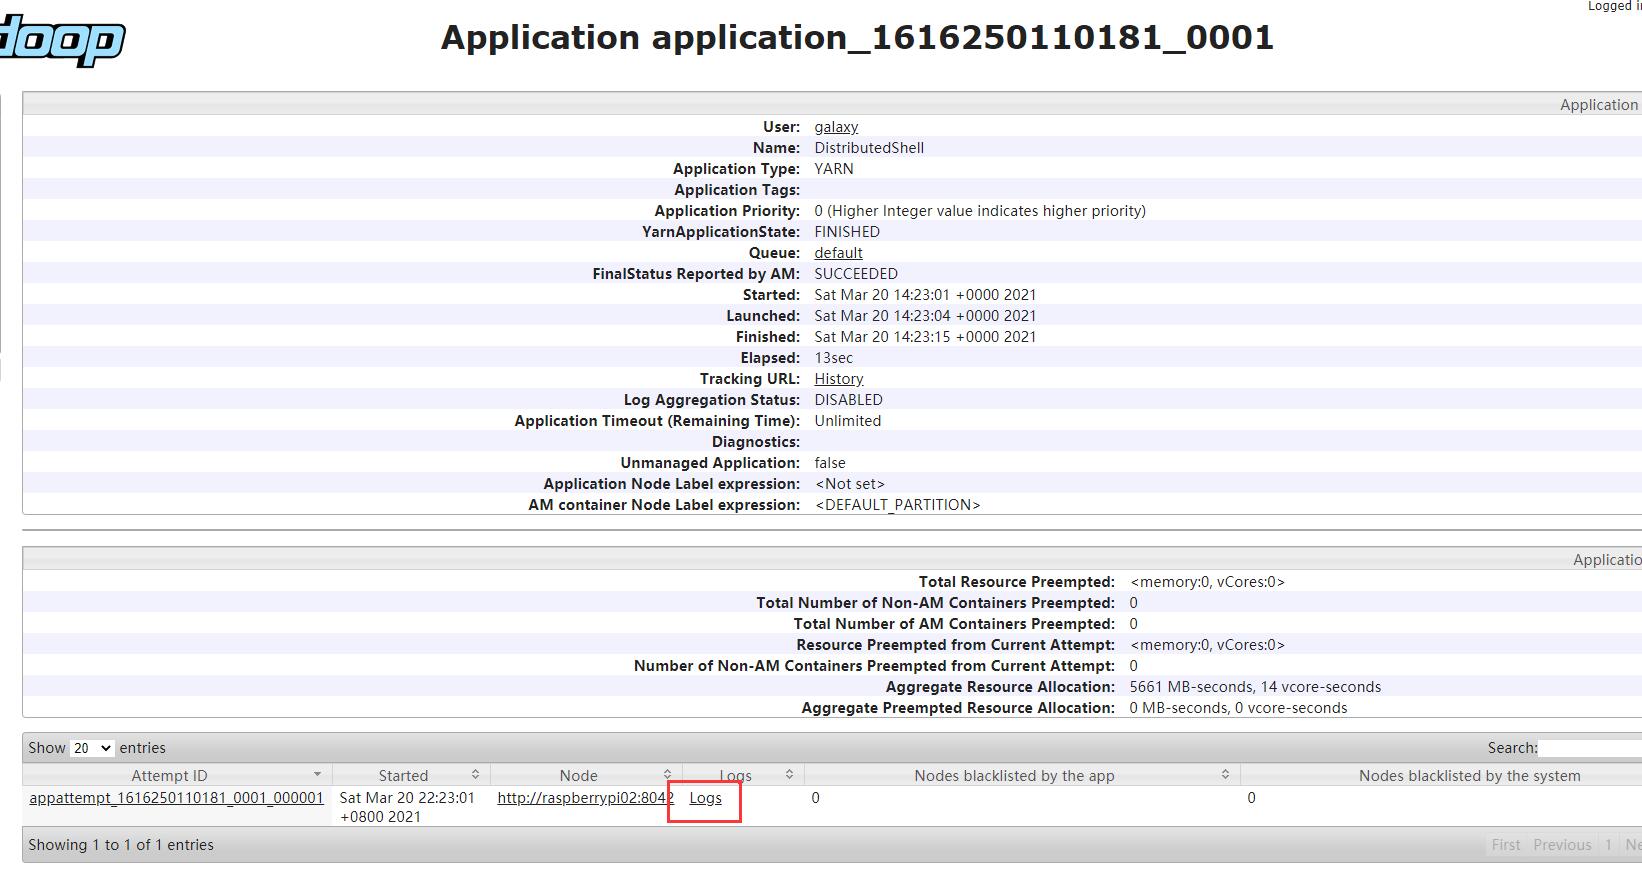
首先我们需要知道app ID,在命令行输出中查找:

在YARN中,可以使用CLI或者UI获知logs,其中,使用CLI需在yarn-site.xml中配置yarn.log-aggregation-enable,而后通过:
yarn logs -applicationId application_1400286711208_0001
访问Logs
UI方式,直接在浏览器中输入http://192.168.137.101:8088/cluster,进入UI界面
4 在YARN上运行MapReduce
4.1 剖析YARN MapReduce
4.1.1 MapReduce流程
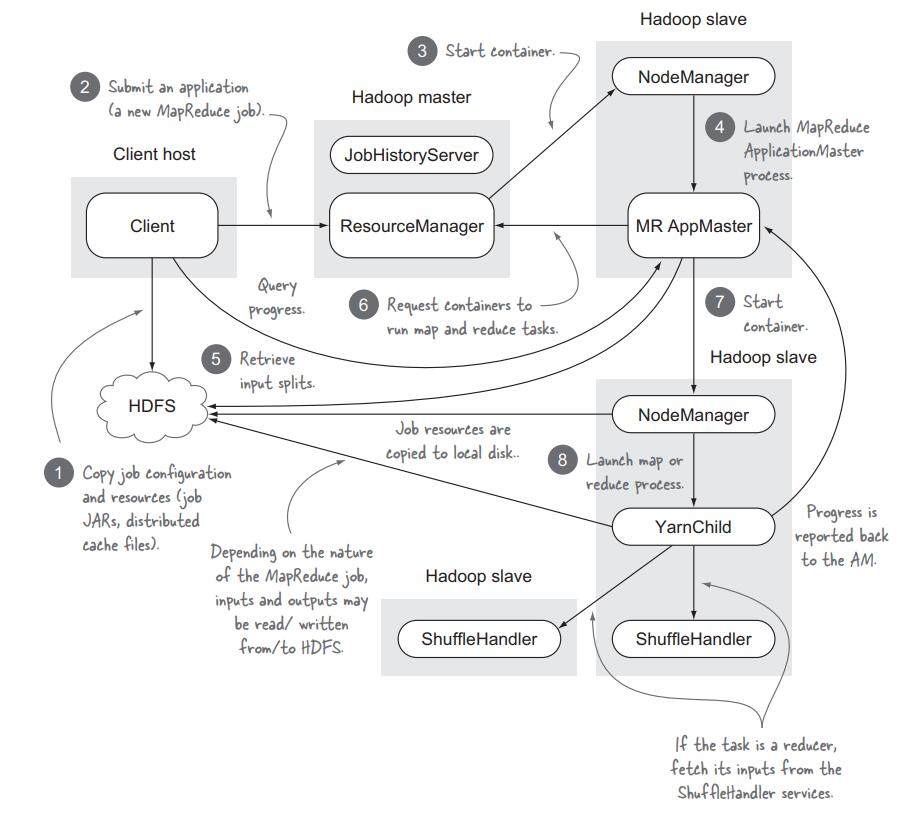
- step 1: clients将input分离开并写入HDFS
- step 2: RM create AM for MapReduce job
- step 3, 4: RM为AM分配container,并通知NM创建AM container。注意,AM也是一个container,所以是需要被创建的。
- step 5: MapReduce AM(MRAM)从HDFS上获取input文件
- step 6: MRAM向RM请求map containers,并要求containers的位置靠近input files存储空间
- step 7, 8: RM向MARM分配containers,map和reduce分别开始工作
4.1.2 编写MapReduce程序(基于Hadoop库)
示例代码:https://github.com/Huangxy-Minel/galaxy/tree/main/dataprocess/mapreduce
首先介绍Hadoop库中几个关键的类
4.1.2.1 Class Mapper<KEYIN,VALUEIN,KEYOUT,VALUEOUT>
参考链接:Package org.apache.hadoop.mapreduce
Function: 输入key/value对,输出中间值key/value对
Hadoop MapReduce框架中,job最初为InputFormat,通过spllit函数将其分割哼InputSplit类,而后每个map函数处理一个InputSplit
其中,InputFormat<K, V>, 通过方法List
  public static class TokenizerMapper
       extends Mapper<Object, Text, Text, IntWritable>{

    private final static IntWritable one = new IntWritable(1);
    private Text word = new Text();

    public void map(Object key, Text value, Context context
                    ) throws IOException, InterruptedException {
      StringTokenizer itr = new StringTokenizer(value.toString());
      while (itr.hasMoreTokens()) {
        word.set(itr.nextToken());
        context.write(word, one);
      }
    }
  }
该例子中,定义类内全局变量one,word,分别代表1和Text类,context.write(word, one)的意义为在context中写入(word, one)这样一个key/value对 对于map函数的含义也很简单,即遍历Text value,读取其中的每个单词,并转换为(word, one)输出
4.1.2.2 Reducer
参考资料:Class Reducer<KEYIN,VALUEIN,KEYOUT,VALUEOUT> Reducer包含3个阶段:
- Shuffle:通过HTTP将Mapper的已经排序好的输出拷贝到本地
- Sort:不同的Mapper输出的key/value对中,key是相同的,故使用key对所有copy过来的中间key/value进行重排序
- Reduce:
public void reduce(Text key, Iterable<IntWritable> values,
                    Context context
                    ) throws IOException, InterruptedException {
    int sum = 0;
    for (IntWritable val : values) {
    sum += val.get();
    }
    result.set(sum);
    context.write(key, result);
}
作用为对每个key(在wordcount中是指word),将value相加,统计sum即代表word出现的总次数。
4.1.2.3 Job类
参考链接:Class Job 该类为用户提供配置、提交、控制、查询状态的接口
4.1.2.4 例程:WordCount类 v1.0
详情请查阅官方文档:Example: WordCount v1.0
4.2 API Backword Compatibility
本章节主要描述向后兼容问题。
- Code compatibility: 指任何MapReduce code都可以在YARN上运行。这意味着我们不需要修改以前编写好的code
- Binary compatibility: 指MapReduce bytecode不需要更改就可以在YARN上运行,这意味着不需要对Hadoop 1的代码重编译。
4.3 编写YARN Application
4.3.1 Fundamentals of building a YARN application
 YARN application包含5个组件:
- YARN client: 负责launching YARN application。向RM发送creatApplication和submitApplication请求
- ResourceManager: 负责接受container allocation requests,异步通知clients什么时候有资源空闲
- ApplicationMaster: 应用的main coordinator,发起container request请求,并launch到node上
- NodeManager: launch或kill containers
- Container: application-specific process,可以实Linux进程,也可以是map or reduce tasks
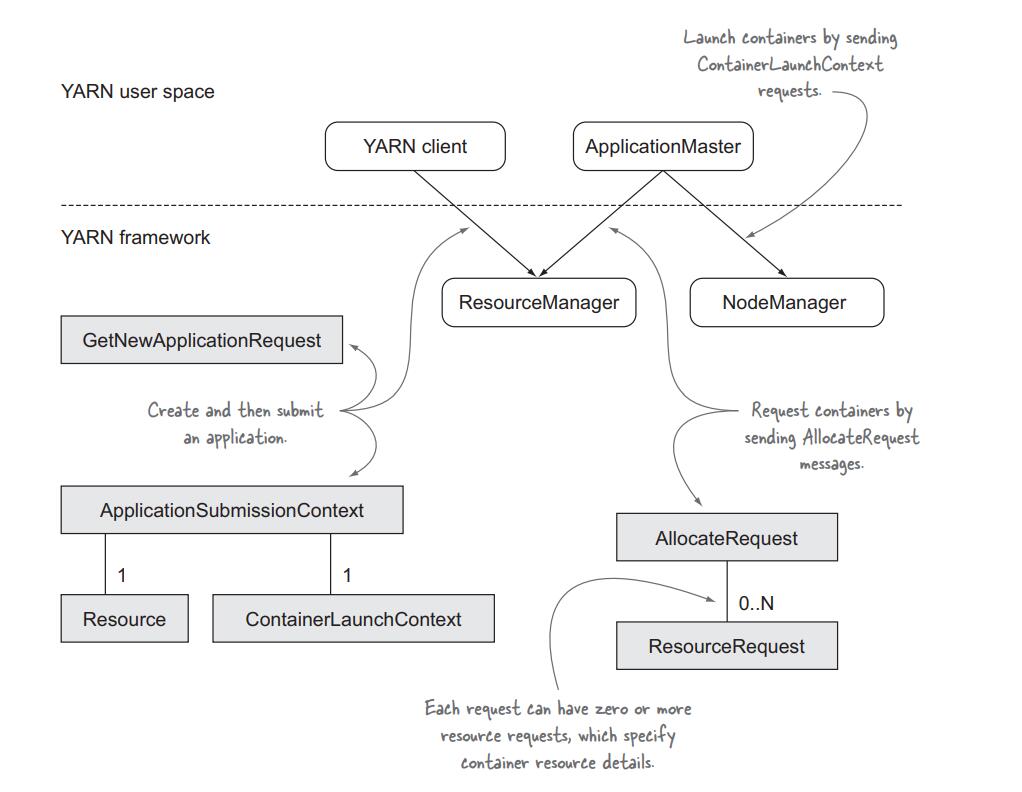
YARN application中的interactions
Resource allocation:
当AM向RM请求新的container时,实际上是请求一个Resource object,这一过程AM向RM发送一个ResourceRequest,如下图:
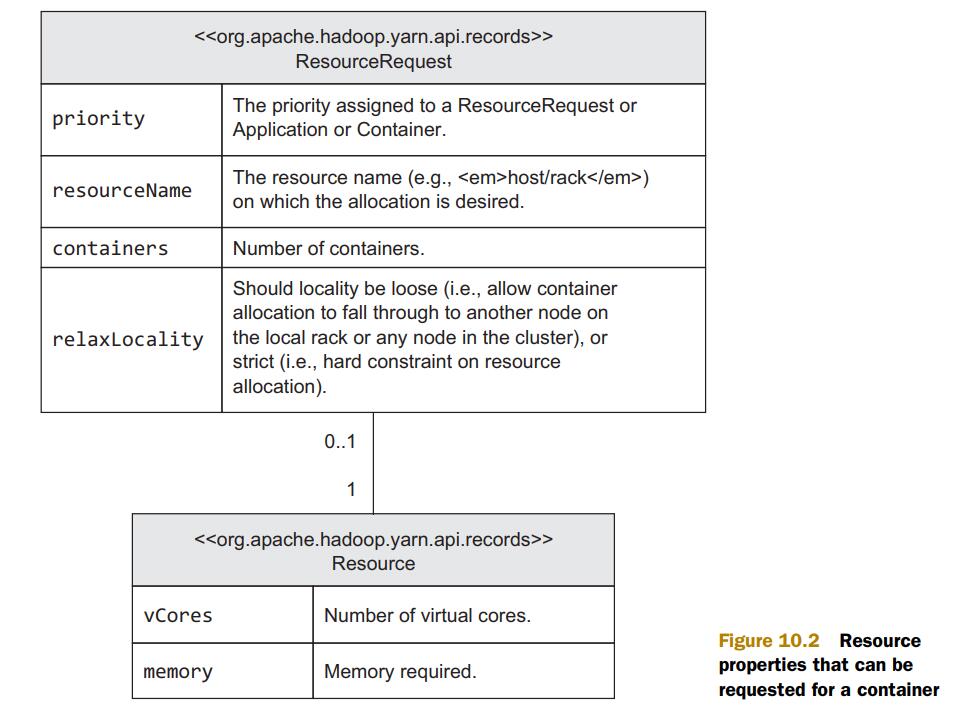 resourceName代表对container的地理位置要求,即指明host和rack的具体名称。RM使用Container Object作为回复。当AM接受到该object,它可以与NM通信,以launch container
Launching a Container
与NM通信使用下图格式;
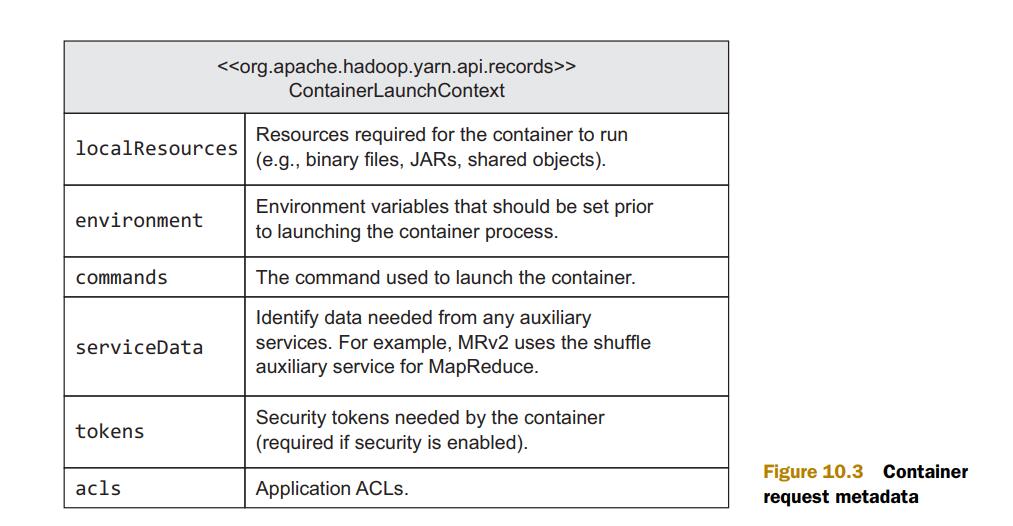 NM根据localResources,将数据从HDFS下载到本地,而后开始launch container
4.3.2 编写一个收集cluster statistics的YARN application
示例代码:https://github.com/Huangxy-Minel/galaxy/tree/main/yarnapp/dstat
下图显示了我们需要编写哪些程序:
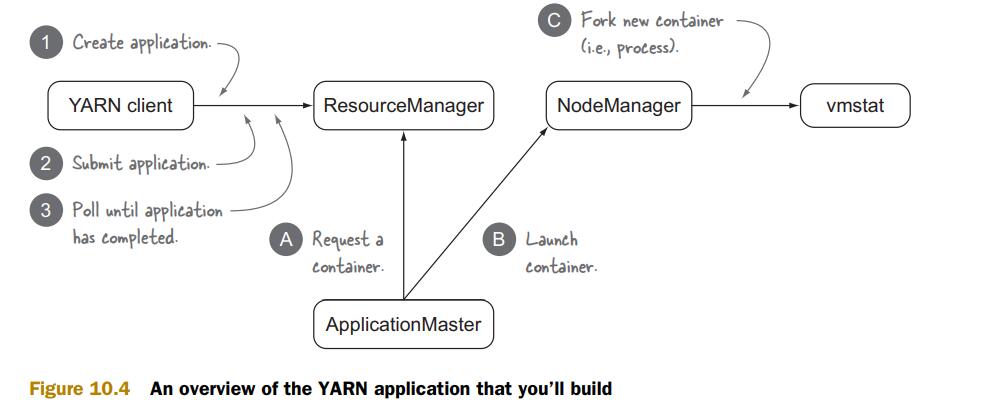 Step 1: YARN client
YARN client有两个功能,1是告知RM AM的系统资源需求,2是监控app的状态
建立Client.class
Step 1.1: Create application
Step 1: YARN client
YARN client有两个功能,1是告知RM AM的系统资源需求,2是监控app的状态
建立Client.class
Step 1.1: Create application
YarnConfiguration conf = new YarnConfiguration();
YarnClient yarnClient = YarnClient.createYarnClient();
yarnClient.init(conf);
yarnClient.start();
YarnClientApplication app = yarnClient.createApplication();
其中YarnConfiguration conf指为conf变量分配YarnConfiguration类大小的内存 new YarnConfiguration()代表新建一个YarnConfiguration实例,并赋值给conf YarnConfiguration是YARN提供的一个配置模板 所以这段代码的含义便是,我们使用一个YARN的配置模板创建了YarnClient类,而后创建了YarnClientApplication类
Step 1.2: Submitting a YARN application 在launch app之前,需要配置一下几样条目:
- app name
- launch AM的命令以及classpath和environment settings
- JARs, configuration files, and other files that app needs
- resource requirements(memory and CPU)
- scheduler queue and priority
- security tokens
上一节我们有谈到,AM需要分别和RM、NM交互,与NM交互所用的格式为Conatiner Launch Context,来指明JARS,环境,文件等等,我们先讲这一部分的配置方法。
//初始化Container Launch Context类
ContainerLaunchContext container =
Records.newRecord(ContainerLaunchContext.class);
//配置stdout和stderr
String amLaunchCmd =
String.format(
"$JAVA_HOME/bin/java -Xmx256M %s 1>%s/stdout 2>%s/stderr",
ApplicationMaster.class.getName(),
ApplicationConstants.LOG_DIR_EXPANSION_VAR,
ApplicationConstants.LOG_DIR_EXPANSION_VAR);

container.setCommands(Lists.newArrayList(amLaunchCmd));
//寻找包含Client.class的JAR路径
String jar = ClassUtil.findContainingJar(Client.class);
FileSystem fs = FileSystem.get(conf);
Path src = new Path(jar);
Path dest = new Path(fs.getHomeDirectory(), src.getName());
//copy到HDFS
fs.copyFromLocalFile(src, dest);

FileStatus jarStat = FileSystem.get(conf).getFileStatus(dest);
//为JAR创建LocalResource
LocalResource appMasterJar = Records.newRecord(LocalResource.class);
appMasterJar.setResource(ConverterUtils.getYarnUrlFromPath(dest));
appMasterJar.setSize(jarStat.getLen());
appMasterJar.setTimestamp(jarStat.getModificationTime());
appMasterJar.setType(LocalResourceType.FILE);
appMasterJar.setVisibility(LocalResourceVisibility.APPLICATION);
//将JAR作为container的local resource
container.setLocalResources(
ImmutableMap.of("AppMaster.jar", appMasterJar));
//将YARN JARs添加值AM的classpath
Map<String, String> appMasterEnv = Maps.newHashMap();
for (String c : conf.getStrings(
YarnConfiguration.YARN_APPLICATION_CLASSPATH,
YarnConfiguration.DEFAULT_YARN_APPLICATION_CLASSPATH)) {
Apps.addToEnvironment(appMasterEnv, Environment.CLASSPATH.name(),
c.trim());
}
//将classpath添加至container的环境中
Apps.addToEnvironment(appMasterEnv,
Environment.CLASSPATH.name(),
Environment.PWD.$() + File.separator + "*");
container.setEnvironment(appMasterEnv);
指明对memory和CPU的要求
Resource capability = Records.newRecord(Resource.class);
capability.setMemory(256);
capability.setVirtualCores(1);
提交APP至RM,使用SubmissionContext
ApplicationSubmissionContext appContext =
app.getApplicationSubmissionContext();
//配置App名字
appContext.setApplicationName("basic-dshell");
appContext.setAMContainerSpec(container);
appContext.setResource(capability);
appContext.setQueue("default");

ApplicationId appId = appContext.getApplicationId();
yarnClient.submitApplication(appContext);
Step 1.3: Waiting for the YARN application to complete
Client需要监控App的状态,并作出相应的调整,App状态如下图
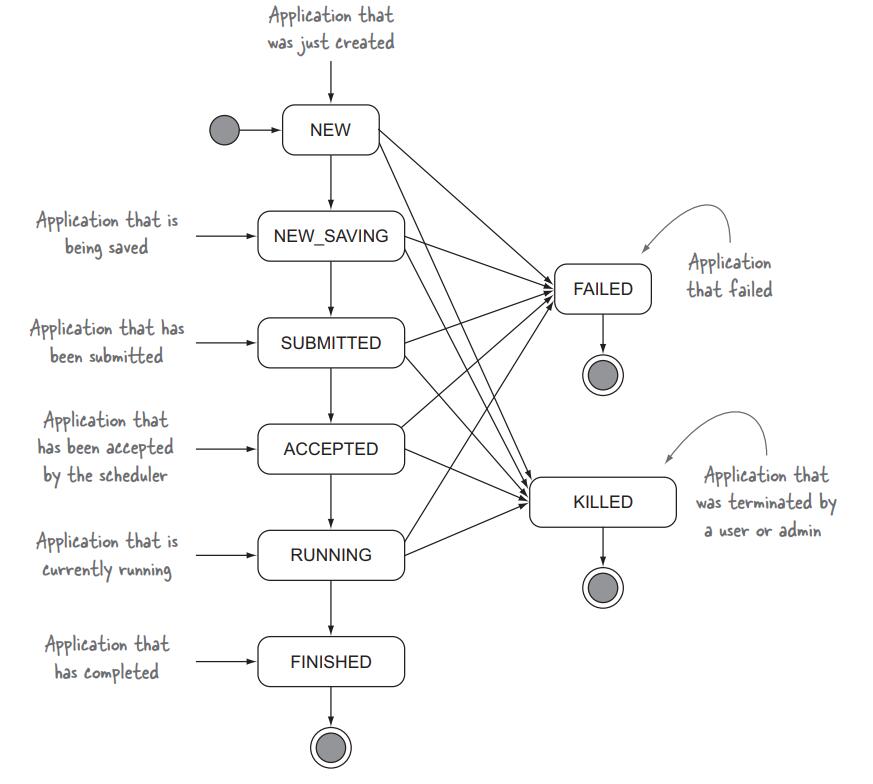 我们可以监控这几种状态值,代码如下
//获取当前状态值
ApplicationReport report = yarnClient.getApplicationReport(appId);
//定义AM终止状态
YarnApplicationState state = report.getYarnApplicationState();
EnumSet<YarnApplicationState> terminalStates =
EnumSet.of(YarnApplicationState.FINISHED,
YarnApplicationState.KILLED,
YarnApplicationState.FAILED);
//循环,直至AM处于终止状态
while (!terminalStates.contains(state)) {
TimeUnit.SECONDS.sleep(1);
report = yarnClient.getApplicationReport(appId);
state = report.getYarnApplicationState();
}
Step 2: 编写AM
AM主要需要编写3个模块,如下图
 Step 2.1: 在RM上登记AM
由于AM也存在于一个container中,所以要现为自己申请一个container
Step 2.1: 在RM上登记AM
由于AM也存在于一个container中,所以要现为自己申请一个container
Configuration conf = new YarnConfiguration();
AMRMClient<ContainerRequest> client = AMRMClient.createAMRMClient();
client.init(conf);
client.start();
client.registerApplicationMaster("", 0, "");
Step 2.2: 提交container request并当可用时launch到NM上
//建立于NM通信的client
NMClient nmClient = NMClient.createNMClient();
nmClient.init(conf);
nmClient.start();

//指明优先级
Priority priority = Records.newRecord(Priority.class);
priority.setPriority(0);
//编写需求
Resource capability = Records.newRecord(Resource.class);
capability.setMemory(128);
capability.setVirtualCores(1);
//建立request object以发送给RM
ContainerRequest containerAsk =new ContainerRequest(capability, null, null, priority);
rmClient.addContainerRequest(containerAsk);

//等待收到container
boolean allocatedContainer = false;
while (!allocatedContainer) {
AllocateResponse response = rmClient.allocate(0);
for (Container container : response.getAllocatedContainers()) {
allocatedContainer = true;

//接受到container后,将其launch
ContainerLaunchContext ctx =
Records.newRecord(ContainerLaunchContext.class);
ctx.setCommands(
Collections.singletonList(
String.format("%s 1>%s/stdout 2>%s/stderr",
"/usr/bin/vmstat",
ApplicationConstants.LOG_DIR_EXPANSION_VAR,
ApplicationConstants.LOG_DIR_EXPANSION_VAR)
));
nmClient.startContainer(container, ctx);
}
TimeUnit.SECONDS.sleep(1);
}
这里,在接受到container后,AM在container上运行了/usr/bin/vmstat命令,当然我们也可以将其改变为其他任何命令,比如运行jar中的app
Step 2.3: 等待container完成
boolean completedContainer = false;
while (!completedContainer) {
AllocateResponse response = rmClient.allocate(0);
for (ContainerStatus s : response.getCompletedContainersStatuses()) {
    completedContainer = true;
}
TimeUnit.SECONDS.sleep(1);
}
rmClient.unregisterApplicationMaster(
FinalApplicationStatus.SUCCEEDED, "", "");
4.3.3 总结
根据之前的代码例程,总结一下编写Client和AM步骤
4.3.3.1 Client
Client的作用很简单,即向RM申请一个container并运行AM。该过程可以被细化为以下几点:
- 创建Client实体
- 配置container参数
- 配置AM参数
- 提交请求,并监控App运行状态
具体来说如下: Step 0: 生成配置模板YarnConfiguration类
Step 1: 创建Client实体 参考YarnClient类
Step 2: 配置container参数 参考ContainerLaunchContext类,该类的创建方法为Records.newRecord(ContainerLaunchContext.class) container中比较关键的参数是launch命令、localresource、environment
Step 3: 配置AM参数 参考YarnClientApplication类 其中需要生成ApplicationSubmissionContext,该context是Client向RM提交的报文
Step 4: 提交请求,监控App 使用YarnClient中submitApplication方法 使用ApplicationReport类以获取App运行状态
4.3.3.2 ApplicationMaster
AM的功能是向RM请求container,请求成功后告知NM launch container,这两步通过AMRMClient,NMClient两个实体完成 大体过程与Client相同,向RM提交container请求报文,向NM提交ContainerLaunchContext以运行container 具体过程如下:
Step 0: 创建通信实体 AMRMClient.createAMRMClient(); NMClient.createNMClient();
Step 1: 请求container 配置ContainerRequest类 通过AMRMClient方法提交请求
Step 2: 得到container后,launch container 配置ContainerLaunchContext类 通过NMClient方法提交launch命令
4.3.4 编写一个YARN app,打出Hello World
完整代码请参考:https://github.com/Huangxy-Minel/galaxy/tree/main/yarnapp/hello
在上一节,我们实现了使用Client完成任务提交,部署AM后申请container,最终在container中运行一条cmd命令。 本节中,笔者将对上一节Client与AM代码进行更改,将申请多个container,并执行Hello.java,将生成的文件上传至HDFS中。
Client并不需要更改,它的作用依然是申请一个container以运行AM。
AM中添加两个containerAsk,即
// ----------------Ask for container----------------
// Config requirements of containers
Priority priority = Records.newRecord(Priority.class);
priority.setPriority(0);
Resource capability = Records.newRecord(Resource.class);
capability.setMemory(64);
capability.setVirtualCores(1);
// Make container requests to ResourceManager
ContainerRequest containerAsk = new ContainerRequest(capability, null, null, priority);
System.out.println("adding two container asks:" + containerAsk);
rmClient.addContainerRequest(containerAsk);
rmClient.addContainerRequest(containerAsk);
接着提交containerRequest,如下
// ----------------Wait and launch containers----------------
int allocatedContainer = 0;
while (allocatedContainer < 2) {
    System.out.println("Waiting for containers......");
    AllocateResponse response = rmClient.allocate(0);
    for (Container container : response.getAllocatedContainers()) {
        ContainerId containerID = container.getId();
        System.out.println("Get a container! ID: " + containerID.toString());
        allocatedContainer++;
        ContainerLaunchContext ctx = createContainerLaunchContext(conf);
        System.out.println("Launching container " + container);
        nmClient.startContainer(container, ctx);
    }
    TimeUnit.SECONDS.sleep(1);
}
Logs输出为:
registerApplicationMaster: pending
registerApplicationMaster: complete
adding two container asks:Capability[<memory:64, vCores:1>]Priority[0]AllocationRequestId[0]ExecutionTypeRequest[{Execution Type: GUARANTEED, Enforce Execution Type: false}]Resource Profile[null]
Waiting for containers......
Waiting for containers......
Get a container! ID: container_1619516610899_0001_01_000002
Launching container Container: [ContainerId: container_1619516610899_0001_01_000002, AllocationRequestId: 0, Version: 0, NodeId: raspberrypi03:38607, NodeHttpAddress: raspberrypi03:8042, Resource: <memory:64, vCores:1>, Priority: 0, Token: Token { kind: ContainerToken, service: 192.168.137.103:38607 }, ExecutionType: GUARANTEED, ]
Get a container! ID: container_1619516610899_0001_01_000003
Launching container Container: [ContainerId: container_1619516610899_0001_01_000003, AllocationRequestId: 0, Version: 0, NodeId: raspberrypi02:39481, NodeHttpAddress: raspberrypi02:8042, Resource: <memory:64, vCores:1>, Priority: 0, Token: Token { kind: ContainerToken, service: 192.168.137.102:39481 }, ExecutionType: GUARANTEED, ]
allocate (wait)
Completed container ContainerStatus: [ContainerId: container_1619516610899_0001_01_000003, ExecutionType: GUARANTEED, State: COMPLETE, Capability: <memory:64, vCores:1>, Diagnostics: , ExitStatus: 0, IP: null, Host: null, ContainerSubState: DONE]
unregister
exiting
可见对于多个container申请,仅需要在rmClient中添加contaienrRequest,在RM中将存放一个申请队列。response.getAllocatedContainers()会返回所有最近申请的container列表,使用for循环遍历即可简单的对所有container操作。当一个container被分配给AM后,其申请队列将减少一个container。
接下来我们尝试在container中进行文件的下载与上传,首先修改AM,使之仅申请一个container,修改Hello代码如下:
public class Hello{
    public static void main(String[] args) throws Exception {
        System.out.println("Hello World!");

        // ----------------Init instance of fs----------------
        YarnConfiguration conf = new YarnConfiguration();
        FileSystem fs = FileSystem.get(conf);
        Path helloPath = new Path(fs.getHomeDirectory(), "hello");
        // ----------------Create Hello----------------
        FSDataOutputStream helloFile = fs.create(helloPath);
        helloFile.writeBytes("Hello World!\n");
    }
}
这里我们在HDFS上创建了一个hello文件,并在其中写入"Hello World!"。注意,这段程序是运行在container中的,并在其中使用了hadoop接口,如果不更改AM种的launch cmd,会报错NoClassDefFoundError: org/apache/hadoop/conf/Configuration 所以我们需要使用hadoop命令来运行该函数,修改AM如下:
final String cmd = "/home/galaxy/hadoop-3.2.2/bin/hadoop jar Container.jar galaxy.testfile.Hello";
String ctnLaunchCmd =
    String.format(
        "%s 1>%s/stdout 2>%s/stderr",
        cmd,
        ApplicationConstants.LOG_DIR_EXPANSION_VAR,
        ApplicationConstants.LOG_DIR_EXPANSION_VAR);
运行Client,可以在HDFS中观察结果如下:
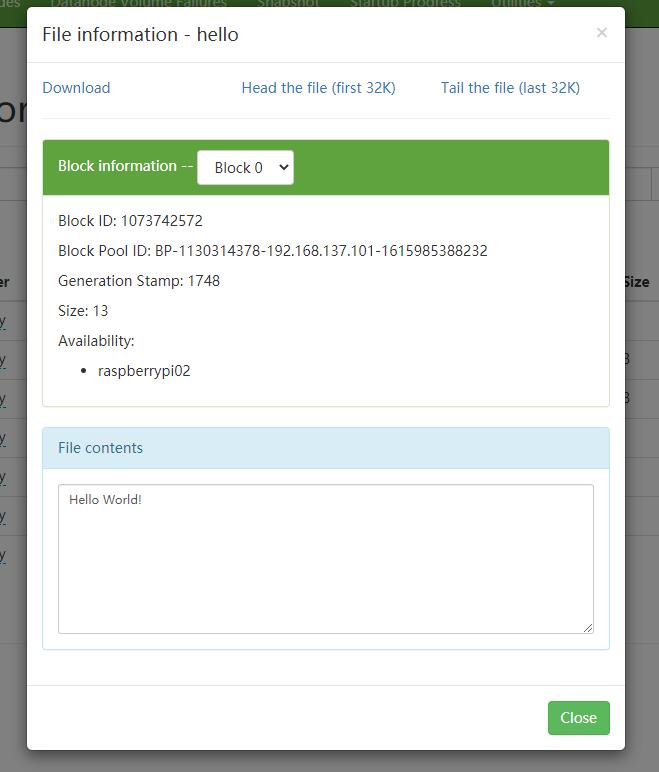 以上,完成了container中的基本操作
4.4 编写YarnApp: MapReduce
本节笔者尝试不适用Hadoop MapReduce接口,以编写一个WordCount程序。